Insulation & Soundproofing for Campervans
Ask any UK vanlifer what makes the biggest difference to comfort, and insulation will top the list. Without it, you’ll freeze in winter, boil in summer, and constantly fight condensation. Soundproofing is just as important, cutting down on rattles, rain noise, and motorway hum. Together, they turn a tin box on wheels into a cosy, liveable home suited for all seasons.
Insulation isn’t glamorous, but it’s the foundation of a good build. Skipping it or cutting corners leads to endless problems - damp bedding, mouldy walls, and wasted money on heating. The UK’s damp climate makes proper insulation non-negotiable. Whether you’re a weekend camper or planning full-time vanlife, this step ensures comfort, energy efficiency, and long-term durability in your conversion.
Soundproofing often gets overlooked, but once you’ve driven hundreds of miles listening to road roar and panels vibrating, you’ll appreciate it. A few strategically placed mats on wheel arches, doors, and panels dramatically reduce noise levels. This makes driving less fatiguing and sleeping on windy nights more peaceful. It’s a small investment with a big return on quality of life.
There are countless insulation materials available in the UK - sheep’s wool, PIR boards, recycled plastic, spray foam, and reflective foils. Each has advantages and drawbacks, from cost and thermal efficiency to eco-friendliness and ease of installation. Choosing the right one for your van depends on your budget, skills, and priorities. Getting it wrong now means tearing down panels later.
Condensation is the hidden enemy of van builds. Warm breath, cooking steam, and showers quickly hit cold metal surfaces and turn to water. Without vapour barriers, mould and rust spread unseen. That’s why insulation isn’t just about warmth - it’s about moisture control. Managing airflow, breathability, and sealing correctly keeps your van healthy for years.
This guide breaks down everything you need to know about Insulation & Soundproofing for Campervans. We’ll cover why it matters, the best materials available in the UK, step-by-step installation, and common mistakes to avoid. Whether you’re aiming for budget-friendly or eco-conscious, you’ll finish with a clear roadmap to a quieter, warmer, and more efficient campervan.
By the end, you’ll know not just what materials to use, but how to install them properly and avoid pitfalls that plague many first-time converters. Done right, insulation and soundproofing are a one-time job that pays off every single day on the road. Done wrong, and you’ll regret it every damp morning or sleepless, noisy night.
Understanding Insulation & Soundproofing for Campervans is essential for any vanlifer looking to enhance their living experience on the road.
Why Insulation is Critical in Campervans
The UK climate is unpredictable - mild one minute, damp and freezing the next. Campervans without insulation quickly become uninhabitable. In winter, metal shells radiate cold; in summer, interiors turn into ovens. Proper insulation creates a barrier, stabilising temperatures and keeping you comfortable year-round. Without it, even the best heater or air circulation system will struggle to make a noticeable difference.
Insulation is also vital for controlling condensation. Every breath, boiling kettle, or steamy shower adds moisture to the air. Without insulation and vapour barriers, that moisture hits cold metal walls and turns to water. Over time, this causes hidden mould, rust, and structural damage. Properly installed insulation acts as a buffer, reducing condensation and protecting both your van and your health.
Comfort is the most immediate benefit. Waking up in a poorly insulated van often means damp bedding, steamed-up windows, and shivering through breakfast. By contrast, insulated vans retain warmth overnight, making mornings bearable. In summer, insulation slows heat transfer, keeping the interior cooler for longer. It doesn’t perform miracles, but it makes life on the road significantly more enjoyable.
Insulation saves money in the long run. A diesel heater will burn through far less fuel in an insulated van, and electric fans will work more efficiently. This means lower running costs, less energy wasted, and more time off-grid. For full-time vanlifers, the savings add up quickly, often justifying the initial investment within a single year of travel.
Resale value is another factor. A properly insulated van is far more attractive to buyers than a bare-metal shell with a bed thrown in. Potential owners know it’ll be warmer, quieter, and free of hidden damp. Documenting your insulation process with photos and receipts adds credibility, reassuring buyers that the van was built with long-term comfort in mind.
Insulation also protects your belongings. Without it, condensation can damage clothes, bedding, and even electrical equipment stored against cold metal walls. Many vanlifers discover ruined cameras, laptops, or musical instruments from being stored in uninsulated vans. Insulation helps regulate humidity levels, providing a safer environment for sensitive gear and making storage more reliable.
Soundproofing overlaps with insulation benefits. Insulated walls and ceilings reduce road noise, making conversations and sleep easier. Thin metal panels amplify vibrations; insulation deadens them. Driving long distances in a poorly insulated van is tiring, with constant noise wearing you down. Adding insulation and soundproofing together turns the interior into a quieter, calmer space, improving safety and comfort on journeys.
Skipping insulation is often a false economy. Builders sometimes rush to get furniture in, thinking they’ll “add insulation later.” Realistically, once walls and cupboards are fitted, revisiting insulation means ripping everything out. Retrofitting is expensive and frustrating. Doing it properly during the initial build is the only sensible approach - cut corners here, and you’ll regret it for the life of the van.
Not all insulation jobs are equal. Throwing in scraps of bubble wrap or carpet underlay won’t provide meaningful warmth or moisture control. In fact, using the wrong materials can make things worse, trapping damp against metal and accelerating rust. Investing in the right insulation from the outset ensures effectiveness and durability, protecting your van and your investment.
Finally, insulation is about peace of mind. A van should feel like a safe, homely space, not a damp shed on wheels. Knowing that you’re protected from condensation, rust, and extreme temperatures lets you relax and enjoy your travels. Insulation may not be the flashiest part of a build, but it’s arguably the most important for long-term vanlife success.
Soundproofing Basics: Reducing Noise on the Road
Noise is one of the most underestimated issues in campervans. Rain hammering the roof, rattling panels, and road vibrations quickly turn journeys into a headache. At night, the same problems disturb sleep, especially if you’re parked near a busy road. Soundproofing isn’t just about comfort - it reduces fatigue while driving and makes your van feel more like a proper living space.
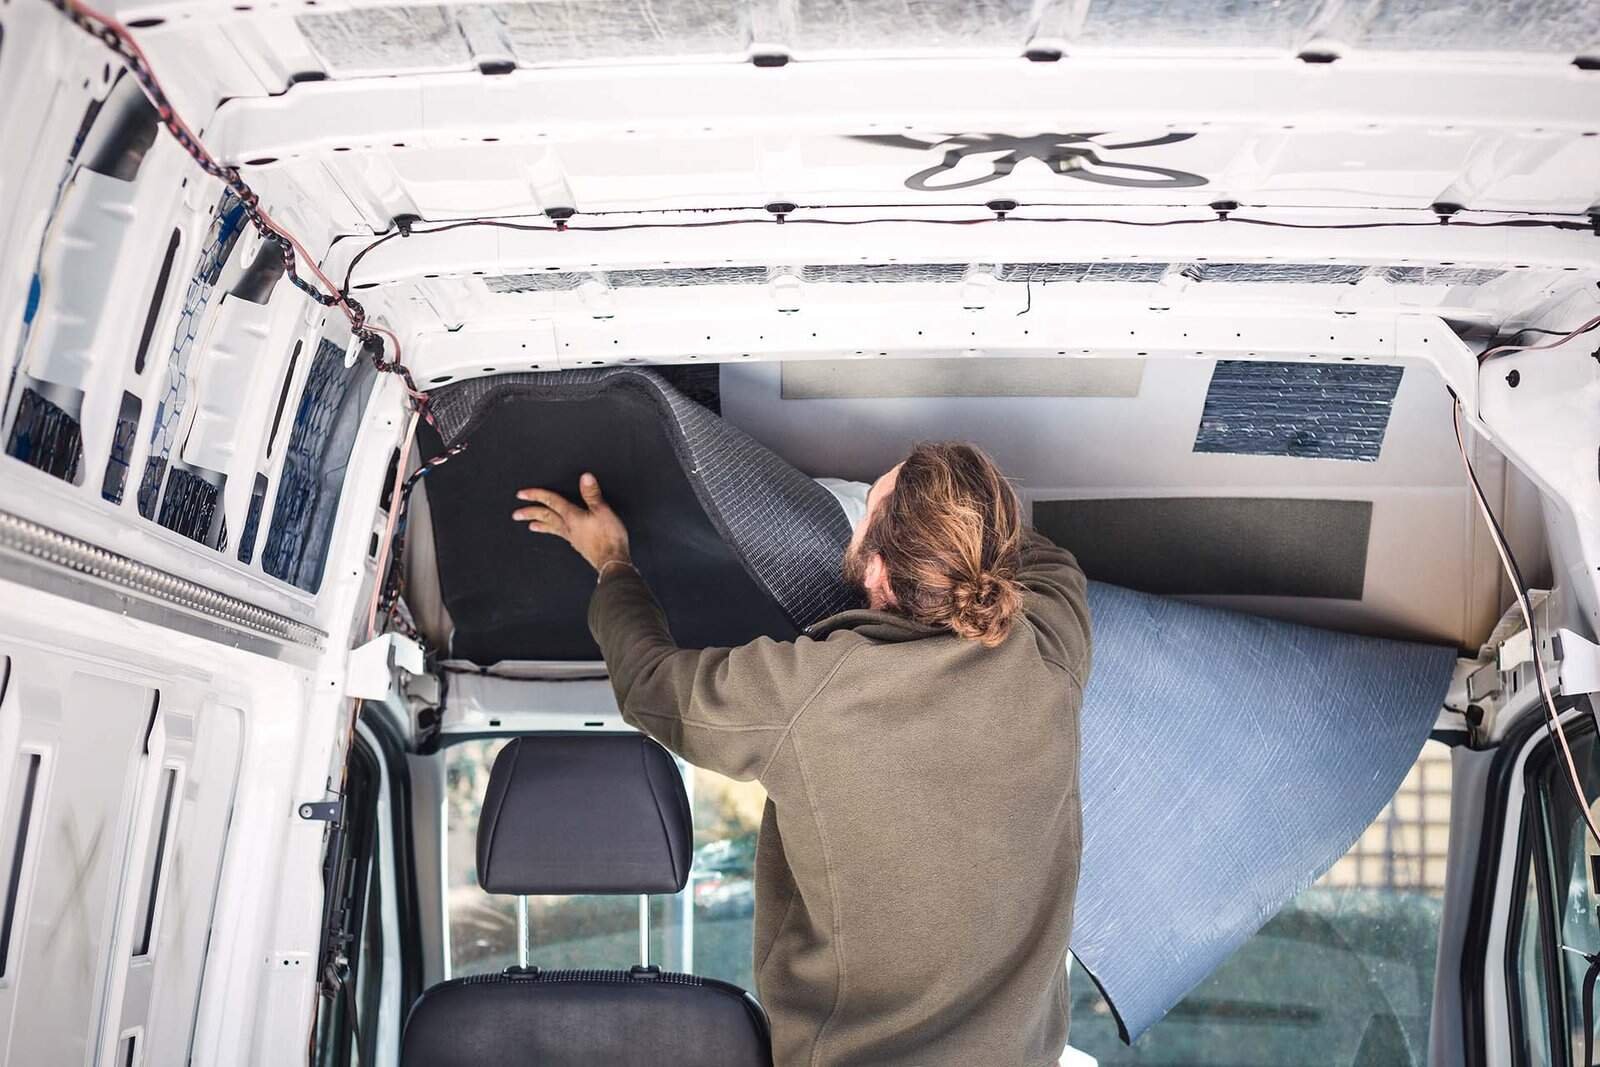
The most effective soundproofing starts with butyl mats. These adhesive-backed sheets stick directly to metal panels, reducing vibration. They don’t insulate against heat, but they do deaden noise dramatically. Applying them to wheel arches, floors, and large flat wall sections makes the biggest difference. Just a 25 - 30% coverage of surfaces is enough - full coverage is unnecessary and wastes money.
Closed-cell foam is the next layer. Unlike soft foams that absorb moisture, closed-cell varieties resist water while reducing higher-frequency sounds. Installed over butyl mats, they create a double barrier: vibration dampening plus airborne noise absorption. This combination is particularly effective on motorway drives, where constant tyre roar otherwise dominates the cabin.
Doors deserve special attention. Sliding and cab doors are thin and transmit huge amounts of noise. Adding butyl mats inside the panels and covering with foam dramatically improves comfort. Cab doors also benefit from replacing old rubber seals, which often wear out and allow wind noise to creep in. The difference after treatment is immediately noticeable.
Wheel arches are another noise hotspot. Their shape amplifies tyre and road noise. Lining them with butyl followed by closed-cell foam cuts decibels significantly. Many vanlifers also box in rear arches with ply and insulation, turning wasted space into storage bases while reducing noise. This dual-purpose approach is one of the most effective upgrades you can make.
The floor is often overlooked. Without treatment, road vibration resonates through the entire van. A layer of butyl beneath insulation and ply subflooring makes a huge difference. Combined with rigid insulation boards, it provides both sound and thermal benefits. Investing time here pays off daily - you’ll hear less rumble and feel less vibration underfoot.
Soundproofing the roof reduces rain noise. Without treatment, heavy showers sound like machine gun fire on thin metal panels. Butyl mats combined with foam reduce this dramatically. This makes sleeping during storms far easier and improves acoustics inside the van, especially if you plan to work, watch films, or play music during your travels.
Even small details help. Loose wires, unsecured panels, and cheap fittings create squeaks and rattles. Securing cables in conduit, tightening fixings, and padding between wood and metal contact points reduces noise further. Soundproofing isn’t just about materials - it’s about attention to detail. A van with no rattles feels more solid, refined, and enjoyable to live in.
The benefits go beyond comfort. Reduced road noise means less fatigue, especially on long drives. Noise levels above 70 decibels contribute to tiredness, reducing concentration and increasing accident risk. A quieter cabin isn’t just nice - it’s safer. Soundproofing also improves resale value, as buyers appreciate vans that feel solid and peaceful rather than tinny and rattly.
Costs are modest compared to other conversion stages. A full set of butyl mats and closed-cell foam for a medium van costs £200 - £400. The difference it makes to comfort is enormous. It’s one of the most cost-effective upgrades in a van build - easy to DIY, affordable, and with immediate results you’ll notice every time you drive or sleep inside.
Types of Insulation Materials
Choosing the right insulation is one of the most important decisions in a campervan build. The UK climate demands materials that handle damp conditions, provide decent thermal resistance, and are safe to live with. Options range from traditional PIR boards to natural sheep’s wool. Each comes with pros and cons - there’s no single “best” choice, only what best suits your van and budget.
Sheep’s wool is one of the most popular natural insulations. It’s breathable, regulates humidity, and has excellent thermal properties. In a damp UK climate, this breathability prevents condensation from being trapped. It’s also eco-friendly and easy to work with. Downsides? It costs more than synthetics and can attract moths if untreated. Most UK suppliers pre-treat wool to avoid that issue.
PIR boards, such as Celotex or Kingspan, are widely used in UK housebuilding and work just as well in vans. They’re rigid, lightweight, and highly efficient for floors, ceilings, and flat walls. Installation requires precise cutting and taping to prevent gaps. If not sealed correctly, cold bridging occurs, reducing effectiveness. They’re affordable compared to wool and provide excellent performance in small thicknesses.
Spray foam insulation divides opinion. It’s praised for filling every cavity and creating a seamless barrier against air and moisture. However, it’s permanent - once applied, you can’t easily change wiring routes or repair rust. It’s also expensive and requires professional equipment. Some vanlifers swear by it, others warn against the lack of flexibility. It’s not ideal for first-time builders who value adaptability.
Recycled plastic insulation, often sold as roll batts, is another strong contender. It’s flexible, safe to handle, and affordable. It doesn’t match PIR boards for R-value, but it’s a good option for stuffing into awkward cavities. Being synthetic, it resists mould and pests better than natural fibres. It’s widely available in the UK and a practical budget-friendly choice.
Reflectix and foil bubble wraps often crop up in forums as a “cheap insulation.” On their own, they’re poor insulators - better at reflecting radiant heat than blocking conduction. In the UK, where cold and damp are bigger issues than radiant heat, they should only ever be used as a supplementary layer, never as the sole insulation. Relying on them alone is a rookie mistake.
Traditional fibreglass may be cheap, but it’s a poor choice for campervans. It absorbs moisture, compacts over time, and releases irritating fibres. In a van’s small, enclosed space, it’s unpleasant and unsafe. For this reason, most modern van builds avoid fibreglass altogether. There are better, safer, and more effective alternatives suited to mobile living.
Multifoil insulation is sometimes marketed as a “miracle solution.” While it has some reflective properties, independent tests show it doesn’t replace traditional insulation. It may add marginal benefits as part of a layered system but should never be the only barrier. If you see builders touting it as a one-stop fix, take their claims with a healthy dose of scepticism.
Eco-conscious vanlifers often mix materials - sheep’s wool in walls for breathability, PIR in floors for rigidity, and recycled plastic in awkward gaps. This hybrid approach balances performance, cost, and sustainability. It also makes it easier to work around different areas of the van. There’s no single “correct” system - your budget and priorities guide the mix.
Cost comparisons help with decision-making. Wool typically costs £15 - £20 per square metre, PIR boards around £10 - £15, recycled plastic £8 - £12, and spray foam significantly more. Reflectix and multifoil are cheap but ineffective alone. For a medium wheelbase van, a full insulation job usually lands between £300 - £800 depending on chosen materials. Compared to the comfort it brings, it’s money well spent.
Fire safety should also influence your decision. PIR boards and treated wool have decent fire resistance. Some foams, however, can emit toxic fumes when burned. Always check fire ratings before installing, and never place insulation directly against hot appliances or heater exhausts. Peace of mind comes from knowing your cosy van won’t turn into a fire hazard.
Durability is another factor. PIR boards hold shape for decades, while wool may slump if not properly supported. Recycled plastic holds up well to vibration and movement. Spray foam is permanent, but impossible to remove or repair. Consider not just initial performance, but how well the insulation will hold up after years of potholes, condensation, and constant use.
To simplify decisions, here’s a quick comparison:
- Best for eco-friendliness: Sheep’s wool.
- Best for value/performance: PIR boards.
- Best for budget: Recycled plastic.
- Best for permanence: Spray foam.
- Best for supplementary use: Reflectix/multifoil.
Choosing the right mix depends on your goals - off-grid comfort, eco-living, or budget travel.
Moisture & Condensation Control
Moisture is the silent enemy of campervans. Every breath, boiling kettle, or damp jacket adds water vapour into the air. When that warm, moist air hits cold metal, it condenses into liquid. Left unchecked, it leads to mould, rust, and rotting wood. Controlling condensation is just as important as insulation itself - without it, even the warmest van becomes unhealthy and uncomfortable.
The UK climate makes this problem worse. Cold, damp winters and humid summers mean vans are constantly battling condensation. Unlike houses, vans have thin walls and limited ventilation, so vapour has fewer escape routes. That’s why insulation alone isn’t enough - proper vapour barriers, airflow, and breathable materials are essential to prevent hidden damp building up behind panels and furniture.
A vapour barrier is your first line of defence. This plastic sheet (often foil-backed) sits over insulation and prevents warm, moist air from reaching cold metal. Joints must be sealed with proper tape for effectiveness. Any gaps, however small, will let vapour through and undermine the system. Skipping this step is one of the most common DIY conversion mistakes.
Not all insulation materials need vapour barriers. Sheep’s wool, for example, is breathable and can absorb and release moisture naturally. PIR boards, on the other hand, require a barrier to stop condensation forming on gaps and edges. Choosing whether to add a vapour barrier depends on your insulation material - but most UK van builders still add one for extra protection.
Ventilation is equally important. Roof fans, louvred vents, or even slightly open windows help release moisture before it condenses. Cooking and showering without ventilation is a recipe for disaster - steam quickly saturates a van. See Campervan Ventilation Fans & Skylights for guidance on airflow. Pairing insulation with proper ventilation creates the most effective moisture management system.
Bathrooms and kitchens are moisture hotspots. Steam from showers and cooking produces litres of water vapour daily. Without extraction fans, that vapour condenses inside cupboards, behind panels, or even on wiring. Locating ventilation near these hotspots ensures moisture escapes quickly, reducing the strain on vapour barriers and insulation. Planning airflow early saves major problems later.
Doors and windows are weak points. Cold glass is an instant condensation magnet. Thermal blinds, insulated curtains, and Reflectix window covers help, but they only reduce - not eliminate - condensation. Wiping down windows in the morning often becomes part of vanlife. The key is minimising it so you’re not constantly battling damp bedding or dripping walls.
Flooring also plays a role. Moisture naturally sinks and can collect under flooring layers. Installing a vapour barrier beneath ply, sealing joints, and leaving small ventilation gaps prevents mould from forming out of sight. Many UK vanlifers discover rotten subfloors within a year of skipping these steps. Protecting floors from hidden damp is essential for long-term durability.
Storage areas are often overlooked. Condensation builds up inside closed cupboards, especially around exterior walls. Drilling small ventilation holes in cupboard bases and leaving gaps for airflow reduces this problem. Using breathable materials like fabric organisers instead of sealed plastic boxes also helps prevent trapped moisture damaging clothes, bedding, or food supplies.
Heating helps reduce condensation but isn’t a cure. Diesel or gas heaters dry the air slightly, but they also produce water vapour if not vented properly. Portable gas heaters are the worst offenders - they dump moisture straight into the van. See Best Diesel Heaters for Campervans (UK Reviews) for safer, drier heating solutions.
Dehumidifiers can be useful in extreme cases.
https://theferalway.com/insulation-soundproofing-for-campervans/


Comments
Post a Comment